Recap
In the first post, I covered project setup and the code that retrieves and parses the arrival predictions data from the TfL API.
In the second post, I used the data from the API to create an image and save it to PNG.
In the third post, I described the hardware and development setup for the project.
The code can be found on on GitHub - london-bus-forecast.
Acknowledgements
This is the first time I've attempted a hardware programming project like this, so I need to acknowledge the projects whose code helped me get this working.
- waveshareteam/e-Paper This is code from the manufacturer that gives C and Python examples for driving its e-paper displays.
- christopherhex/rust-epaper: WaveShare E-paper display implementation in rust This project uses rust to drive a Waveshare e-paper display, albeit a different one than mine. I used this as a pattern for my code combined with the manufacturer's example code.
- caemor/epd-waveshare: Drivers for various EPDs from Waveshare and others This project provides functionality for various e-paper displays including mine. I also used this project for reference.
Control Pins
At the basic level, the display has a few inputs and outputs which are connected to pins on the Raspberry Pi header. In the GPIO interface, it has 4 output pins, which control the display, and 1 input pin which receives signals from the display.
Data and commands are sent via the Serial Peripheral Interface (SPI).
Output pins
PWRthis is the power control. This needs to be set to high.RSTSet low to reset the displayCSSPI chip select. When this is low, the display will accept data/commandsDCData/Command control pin. When high, it accepts data over SPI. When low accepts commands.
Input pin:
BUSYThe display sets this to low when it is is busy. The controller should not send commands when the display is busy.
SPI also has a clock pin and a data pin, but these are abstracted by the Spi struct of the rpi_pal library.
Basic Functions
To control the display, we need a few basic functions.
- Initialise our representation of the display
- Reset the display
- Send command
- Send data
- Wait until the display is not busy
Initialise
Following christopherhex/rust-epaper, we represent the e-paper display by a struct for the GPIO pins and for the SPI interface.
use rpi_pal::gpio::{Gpio, InputPin, OutputPin};
use rpi_pal::spi::{Bus, Mode, SlaveSelect, Spi};
const RST_PIN: u8 = 17;
const DC_PIN: u8 = 25;
const CS_PIN: u8 = 8;
const BUSY_PIN: u8 = 24;
const PWR_PIN: u8 = 18;

struct RpiGpioConfig {
    reset: OutputPin,
    dc: OutputPin,
    cs: OutputPin,
    busy: InputPin,
    pwr: OutputPin,
}

pub struct RaspiPaper {
    config: RpiGpioConfig,
    spi: Spi,
}
We create a new method to initialise the struct and also power-on the device.
pub fn new() -> anyhow::Result<Self> {
    let gpio_inst = Gpio::new()?;

    let mut config = RpiGpioConfig {
        reset: gpio_inst.get(RST_PIN)?.into_output(),
        dc: gpio_inst.get(DC_PIN)?.into_output(),
        cs: gpio_inst.get(CS_PIN)?.into_output(),
        busy: gpio_inst.get(BUSY_PIN)?.into_input(),
        pwr: gpio_inst.get(PWR_PIN)?.into_output(),
    };
    config.pwr.set_high();

    let spi = Spi::new(Bus::Spi0, SlaveSelect::Ss0, 4_000_000, Mode::Mode0)?;

    // Return RaspiPaper Struct
    Ok(Self { config, spi })
}
Reset
A reset is performed by setting the reset pin low. We also need to wait some milliseconds.
pub fn reset(&mut self) {
    self.config.reset.set_high();
    thread::sleep(Duration::from_millis(20));
    self.config.reset.set_low();
    thread::sleep(Duration::from_millis(2));
    self.config.reset.set_high();
    thread::sleep(Duration::from_millis(20));
}
Send Command
We send a command by
- Set the DC pin low for command mode
- Set the CS pin low to start sending the command
- Send the command over SPI
- Set the CS pin high again
pub fn send_command(&mut self, data: u8) {
    self.config.dc.set_low();
    self.config.cs.set_low();
    self.spi.write(&[data]).unwrap();
    self.config.cs.set_high();
}
Send Data
Sending data is similar to sending a command, except the DC pin must be set high. If we are sending more than one byte, we can send it in batches with a maximum size of 4096.
const PAGE_SIZE: usize = 4096;
pub fn send_data(&mut self, data: &[u8]) {
    self.config.dc.set_high();
    self.config.cs.set_low();
    // Write Byte
    let (chunks, rem) = data.as_chunks::<PAGE_SIZE>();
    for chunk in chunks {
        self.spi.write(chunk).unwrap();
    }
    if !rem.is_empty() {
        self.spi.write(rem).unwrap();
    }
    self.config.cs.set_high();
}
Wait on busy
As mentioned, after performing certain actions we need to wait for the busy pin to go high so we can send more commands and data. This function does this.
pub fn read_busy(&mut self) {
    println!("e-Paper busy");
    self.send_command(COMMAND_GET_STATUS);
    while self.config.busy.is_low() {
        self.send_command(COMMAND_GET_STATUS);
    }
    thread::sleep(Duration::from_millis(20));
    println!("e-Paper busy release");
}
The COMMAND_GET_STATUS has a value of 0x71. These are defined as constants, but I'm going to omit the rest such command codes from this explanation for brevity.
Higher-level Functions
With those initial functions defined we can define some higher-level functions
init and init_fast
These functions set some of the parameters for the display after switching on. For example, it specifies whether we want black/white or 4-colour greyscale mode.
I am omitting them here as they are a bit long and it's not clear to me what each part does (I copied them from waveshareteam/e-Paper).
Sleep Mode
To save power, we can put the screen into sleep mode between draws.
pub fn sleep(&mut self) {
    self.send_command(COMMAND_VCOM_AND_INTERVAL_SETTING);
    self.send_data(&[0xF7]);
    self.send_command(COMMAND_POWER_OFF);
    self.read_busy();
    self.send_command(COMMAND_DEEP_SLEEP);
    self.send_data(&[0xA5]);
    thread::sleep(Duration::from_millis(100));
}
Display
The key function is the one that actually displays the image. The input image is a greyscale image where each pixel is a byte.
The data we need to send differs:
- Each pixel is one bit for black and white so we need to use bitwise manipulations and thresholds to pack 8 pixels into one byte.
- The pixel values are inverted: black = 1 and white = 0.
This function does the conversion. The pixel with number $8x + y$ corresponds to binary digit $y$ of byte $x$ that we send.
The expression 0x80 >> key2 is a number where binary digit key2 is 1 and the others are zero. By using this with the $|=$ assignment operator, it sets the digit of shrink_vec[key] to 1 if our pixel value is less than 255: meaning it is not white.
pub const GRAY1: u8 = 0xff; //white
pub const GRAY4: u8 = 0x00; //Blackest
const EPD_WIDTH: usize = 800;
const EPD_HEIGHT: usize = 480;
const BUFSIZE: usize = EPD_WIDTH * EPD_HEIGHT / 8; // 1 bit per pixel

pub fn convert_buffer(image: &[u8]) -> Vec<u8> {
    let mut shrink_vec = vec![0; BUFSIZE];
    for (i, pix) in image.iter().enumerate() {
        let (key, key2) = (i / 8, i % 8);
        if *pix < 255 {
            shrink_vec[key] |= 0x80 >> key2;
        }
    }
    shrink_vec
}
Now that the image is processed, we can send it to the display. Only, we also need to send an inverted image first (image1). After the data is sent, we send the display refresh command which makes the display draw the data we have sent.
pub fn display(&mut self, image: &[u8]) {
    let other_image = Self::convert_buffer(image);
    let mut image1 = vec![GRAY1; BUFSIZE];
    let width = EPD_WIDTH / 8;
    let height = EPD_HEIGHT;
    for j in 0..height {
        for i in 0..width {
            image1[i + j * width] = !other_image[i + j * width];
        }
    }
    self.send_command(COMMAND_DATA_START_TRANSMISSION1);

    self.send_data(&image1);
    self.send_command(COMMAND_DATA_START_TRANSMISSION2);
    self.send_data(&other_image);

    self.send_command(COMMAND_DISPLAY_REFRESH);
    thread::sleep(Duration::from_millis(100));
    self.read_busy();
}
We also define a clear command, which just sends a blank white image.
EPaper trait
The RaspiPaper represents the display hardware, but I'm going to introduce another layer of abstraction with the EPaper trait.
pub trait EPaper {
    fn init_for_draw(&mut self);
    fn sleep(&mut self);
    fn clear(&mut self);
    fn init(&mut self);
}
pub struct RaspiPaperMono(RaspiPaper);
impl RaspiPaperMono {
    pub fn new() -> anyhow::Result<Self> {
        Ok(Self(RaspiPaper::new()?))
    }
}
impl EPaper for RaspiPaperMono {
    fn init(&mut self) {
        self.0.init();
    }
    fn init_for_draw(&mut self) {
        self.0.init_fast();
    }
    fn clear(&mut self) {
        self.0.clear();
    }
    fn sleep(&mut self) {
        self.0.sleep();
    }
}
The reason is so that I have the option to operate the display in greyscale mode. The code for this is in the github repo and it just uses a different method for init_for_draw.
ImageWrite trait
Recall in the second post, we defined an ImageWrite trait: a sort of interface for writing an image somewhere. At first, we implemented it for a PNG file. Now we can implement it for our display!
impl ImageWrite for RaspiPaperMono {
    fn put_image(
        &mut self,
        image: &image::ImageBuffer<image::Luma<u8>, Vec<u8>>,
    ) -> anyhow::Result<()> {
        self.0.display(image.as_raw());
        Ok(())
    }
}
First Attempt at a main function
Now we we can more-or-less use the same structure as the PNG writing code to try out the display.
The main differences are:
- We run
init_for_drawto get the writer ready - We need to clear the image when we are finished to prevent damage. We do so after waiting 5 seconds.
#[cfg(feature = "rpi")]
fn main() -> anyhow::Result<()> {
    dotenvy::dotenv()?;
    let stop_id = std::env::var("STOP1")?;
    let stop_id2 = std::env::var("STOP2")?;
    let tfl_key = std::env::var("TFL_KEY").ok();


    let image = make_grayscale_image(&stop_id, &stop_id2, tfl_key.as_deref())?;

    let mut writer =  RaspiPaperMono::new()?;
    writer.init_for_draw();

    writer.put_image(&image)?;
    thread::sleep(Duration::from_secs(5));

    println!("Shutting down");
    writer.init();
    writer.clear();
    writer.sleep();

    Ok(())
}
I compiled the code using cross and used scp to copy the executable to the Raspberry Pi over SSH. The first time I did this, I had to use chmod +x to set the executable flag on the file. I also needed to copy over my .env file.
Running it does display an image, but to my horror it looks like this:
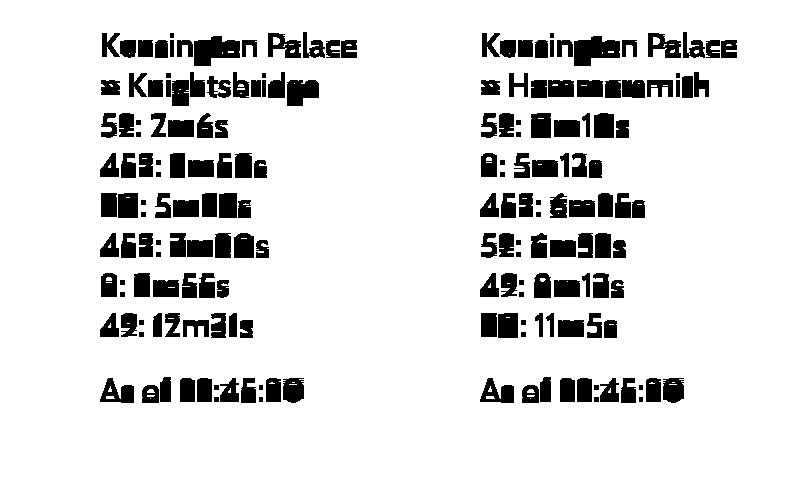
What went wrong?
Fixing the image
The problem is in the code that converts from greyscale to a 1-bit black and white image. This code treats every pixel that is not pure white (value=255) as black.
if *pix < 255 {
    shrink_vec[key] |= 0x80 >> key2;
}
One thing we can do is change the 255 threshold1. This is what it would look like with 254, which is much better.
Still a bit nasty to be honest.
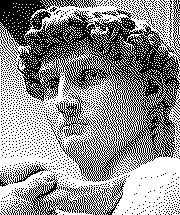
Another option is Floyd-Steinberg Dithering, which can create the illusion of a higher color depth. Here is an image copied from Wikipedia which shows how it can work.
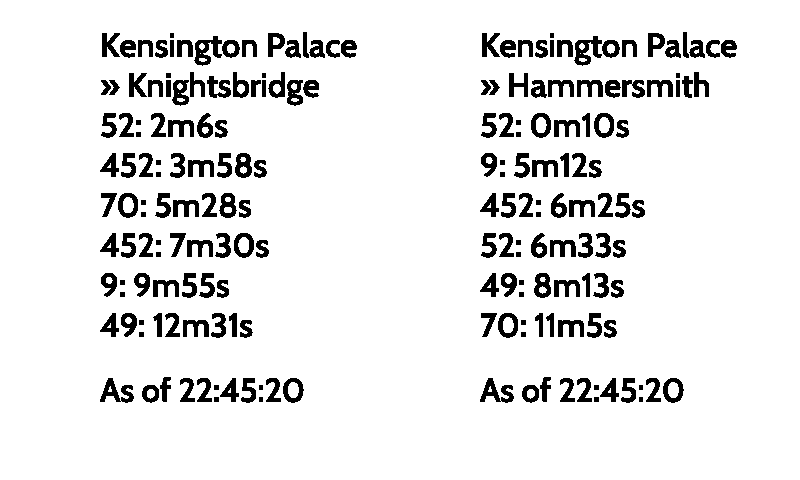
Fortunately, the image crate implements this algorithm for us. We just replace the call to make_grayscale_image with make_dithered_image.
use image::imageops::{BiLevel, dither};

fn make_dithered_image(
    stop_id: &str,
    stop_id2: &str,
    tfl_key: Option<&str>,
) -> anyhow::Result<ImageBuffer<Luma<u8>, Vec<u8>>> {
    let mut image = make_grayscale_image(stop_id, stop_id2, tfl_key)?;
    dither(&mut image, &BiLevel)
    Ok(image)
}
Here is the result:

Running in a Loop
We wanted a noticeboard that updates the bus times every 30 seconds. What we have is something that displays the image and then turns itself off.
Let's make an infinite loop.
const UPDATE_FREQUENCY_S: u64 = 30;
#[cfg(feature = "rpi")]
fn main() -> anyhow::Result<()> {
    dotenvy::dotenv()?;
    let stop_id = std::env::var("STOP1")?;
    let stop_id2 = std::env::var("STOP2")?;
    let tfl_key = std::env::var("TFL_KEY").ok();

    let mut writer =  RaspiPaperMono::new()?;
    loop {

        let image = make_dithered_image(&stop_id, &stop_id2, tfl_key.as_deref())?;

        writer.init_for_draw();

        writer.put_image(&image)?;
        writer.sleep();

        thread::sleep(Duration::from_secs(UPDATE_FREQUENCY_S));
    }
    Ok(())
}
This is OK, but there is a problem which is that if we want to stop the process, it will exit instantly and not run the cleanup code that clears the screen to prevent damage.
Cleaning Up
The signal-hook crate allows us to handle the interrupt and terminate signals so we can run the cleanup before exiting.
We create a new flag called shutdown_requested, which starts as false. We register the SIGTERM and SIGINT signals so when the process receives them, it sets shutdown_requested to true. This can happen at any time.
Now in our loop, we always check whether shutdown_requested has been triggered. If so, it will end the loop and run the cleanup code at the end of the function.
use std::sync::{Arc, atomic::AtomicBool, atomic::Ordering};

use signal_hook::consts::{SIGINT, SIGTERM};
use signal_hook::flag as signal_flag;
#[cfg(feature = "rpi")]
fn main() -> anyhow::Result<()> {
    let shutdown_requested = Arc::new(AtomicBool::new(false));
    signal_flag::register(SIGTERM, Arc::clone(&shutdown_requested))?;
    signal_flag::register(SIGINT, Arc::clone(&shutdown_requested))?;

    let stop_id = std::env::var("STOP1")?;
    let stop_id2 = std::env::var("STOP2")?;
    let tfl_key = std::env::var("TFL_KEY").ok();
    let mut writer = RaspiPaperMono::new()?;
    while !shutdown_requested.load(Ordering::Relaxed) {
        let image = make_dithered_image(&stop_id, &stop_id2, tfl_key.as_deref())?;

        writer.init_for_draw();

        writer.put_image(&image)?;
        writer.sleep();
        thread::sleep(Duration::from_secs(UPDATE_FREQUENCY_S));
    }
    println!("Shutting down");
    writer.init();
    writer.clear();
    writer.sleep();

    Ok(())

}
Problem solved? Not yet...
The final problem is that the shutdown is only checked every 30 seconds, which is not exactly responsive.
There are fancy multi-threaded solutions or async solutions, but I'm just going to go for a "polling" solution. Check for a shutdown every 250ms and increment a counter, if the counter is divisible by 30s / 250ms = 120, then update the display.
#[cfg(feature = "rpi")]
fn main() -> anyhow::Result<()> {


    const SLEEP_TIME_MILLI: u64 = 250;
    const N_ITER: usize = (UPDATE_FREQUENCY_S * 1000 / SLEEP_TIME_MILLI) as usize;

    dotenvy::dotenv()?;
    let shutdown_requested = Arc::new(AtomicBool::new(false));
    signal_flag::register(SIGTERM, Arc::clone(&shutdown_requested))?;
    signal_flag::register(SIGINT, Arc::clone(&shutdown_requested))?;
    let stop_id = std::env::var("STOP1")?;
    let stop_id2 = std::env::var("STOP2")?;
    let tfl_key = std::env::var("TFL_KEY").ok();
    let mut writer = RaspiPaperMono::new()?;

    let mut counter = 0;
    while !shutdown_requested.load(Ordering::Relaxed) {
        use std::{thread, time::Duration};
        if counter == 0 {
            writer.init_for_draw();
            let image =
                make_dithered_image(&stop_id, &stop_id2, tfl_key.as_deref())?;
            writer.put_image(&image)?;
            writer.sleep();
        }

        thread::sleep(Duration::from_millis(SLEEP_TIME_MILLI));
        counter = (counter + 1) % N_ITER;
    }
    println!("Shutting down");
    writer.init();
    writer.clear();
    writer.sleep();

    Ok(())
}
Running as a Service
Let's run the program as a service so it can run at startup and get restarted if it goes wrong.
Open a new service config file with
sudo nano /etc/systemd/system/eink-service.service
Paste in the following:
[Unit]
Description=Rust E-Ink Display Service
# Start after the network is up and after the local file system is ready.
After=network.target local-fs.target

[Service]
WorkingDirectory=/home/bus/eink-app
ExecStart=/home/bus/eink-app/london-bus-forecast-eink


Restart=on-failure
# Wait 5 seconds before restarting
RestartSec=5s

KillSignal=SIGTERM

# Wait 20s after a SIGTERM for clean up, then send SIGKILL
TimeoutStopSec=20s

User=bus
Group=bus

[Install]
# Start this service when the device boots into multi-user mode
WantedBy=multi-user.target
Then enable the service with the following:
sudo systemctl daemon-reload
sudo systemctl enable eink-service.service
sudo systemctl start eink-service.service
You can check the output logs with
journalctl -u eink-service.service -f
I could verify that the process started and updated the display.
I could also verify that my application was handling termination correctly by running
sudo systemctl stop eink-service.service
As hoped, the screen cleared as the service shut down.
Conclusion
That's it! I'm pleased with how the project turned out. I hope you found it interesting.
In fact image editing, this transformation is called "Threshold".